Exchange upgrade fails due to missing language files

Just to help anyone out there that might be facing this issue. I’ve helped troubleshoot an Exchange 2010 RTM upgrade to Exchange 2010 SP3 which kept failing due to missing language files…

Event ID 1603 was also thrown as per to the KB 2784788 – “1635” or “1603” error code when you install update rollups or service packs for Exchange Server 2007 or Exchange Server 2010

The MSILOG indeed showed that the setup was looking for the RTM language files in the original location where the setup files were, but they are long gone… with the RTM DVD no where to be-found (RTM trial files + the oldest Language Pack bundle are in a non compatible version) this situation was doomed to failure.

So, I’ve turned to manually remove any references to the Client / Server language packs on the server, this included removing a whole bunch of registry keys:

HKEY_LOCAL_MACHINE\SOFTWARE\Microsoft\ExchangeServer\v14\Language Packs\ <-- the whole KEY
HKEY_LOCAL_MACHINE\SOFTWARE\Classes\Installer\Products\  <-- Whatever "Microsoft Exchange ** Language Pack" I found
HKEY_LOCAL_MACHINE\SOFTWARE\Microsoft\Windows\CurrentVersion\Uninstall\  <-- Whatever "Microsoft Exchange ** Language Pack" I found
HKEY_LOCAL_MACHINE\SOFTWARE\Microsoft\Windows\CurrentVersion\Installer\UserData\S-1-5-18\Products  <-- Whatever "Microsoft Exchange ** Language Pack" I found

Following this brutal way, I’ve stumbled upon a way to Applying Small Updates by Reinstalling the Product this actually achieves what the installer wants:

msiexec /i Server<or>ClientLanguagePack.msi REINSTALLMODE=vomus

And it works ! Now, I guess that with a script this would have been much quicker then the registry method, but at least now I’m (and you are) aware of this workaround , and here’s the script for your usage:

** edit the $setuplocation variable for your directory of the servicepack.

$setupLocation = "c:\sp3"
$allDirs = dir $setupLocation -Directory
foreach ($dir in $allDirs)
{
if (Test-Path ($dir.FullName + "\clientlanguagepack.msi")) {Write-Host "Installing" $dir.name ; Start-Process -FilePath msiexec -ArgumentList /i, ($dir.FullName + "\clientlanguagepack.msi"), "REINSTALLMODE=vomus" -Wait }
if (Test-Path ($dir.FullName + "\serverlanguagepack.msi")) {Write-Host "Installing" $dir.name ; Start-Process -FilePath msiexec -ArgumentList /i, ($dir.FullName + "\serverlanguagepack.msi"), "REINSTALLMODE=vomus" -Wait }
}

ilantz


Additional references:

Upgrading Service pack – keep asking for language pack

http://stackoverflow.com/a/7916340 – credit for the REINSTALLMODE=vomus trick
How to restore the missing Windows Installer cache files and resolve problems that occur during a SQL Server update – kb 969052

Don’t forget to modify your Windows Server Power Options

Following a troubleshooting session I’ve had lately, I wanted to share with you an important recommended settings that most folks (myself included) often overlook.

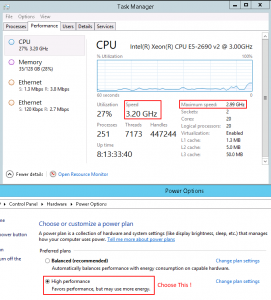
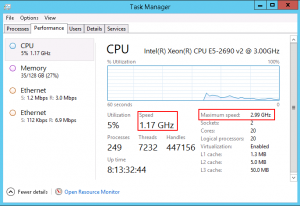
With more and more virtual servers and less and less physical servers being deployed, capabilities like SpeedStep of a CPU were forgotten. Take for example the following “modest” specifications of Intel Xeon E5-2690 v2, with 10 cores @ 3.0 GHz this is a “fare” spec for a high load / CPU intensive profile server.

BUT ! if you forget to select the “High Performance” power option in Windows Server for example, you could end up with:

e5-2690v2 at half speed

Notice that the speed of the CPU is less the half the speed it can run at. now to make things better, just make sure to select the “preferred” settings for your busy server:

e5-2690v2 at full speed

Just a heads up for all you folks out there, the default “Balanced” option caused a performance issue with an Exchange 2013 server that was running on this physical hardware and once the option was changed – all was back to normal 🙂

ilantz

Update your Windows 7 SP1 and Server 2008 R2 SP1

In case you’ve missed it, Microsoft released a roll-up update Hotfix for Windows 7 SP1 and Server 2008 R2 SP1 which includes 90 updates (!) post-SP1 – An enterprise hotfix rollup is available for Windows 7 SP1 and Windows Server 2008 R2 SP1

Here’s a quote from the KB:

This article describes a hotfix rollup for Windows 7 Service Pack 1 (SP1)-based and Windows Server 2008 R2 SP1-based computers. This hotfix rollup contains 90 hotfixes that were released after the release of SP1 for Windows 7 and Windows Server 2008 R2. These hotfixes improve the overall performance and system reliability of Windows 7 SP1-based and Windows Server 2008 R2 SP1-based computers. We recommend that you apply this hotfix rollup as part of your regular maintenance routine and build processes for Windows 7 and Windows Server 2008 R2 computers.
Note This hotfix rollup primarily addresses the issues that occur on domain-joined client computers and servers. Therefore, this hotfix rollup is available only from the Microsoft Update Catalog. You can also install this hotfix rollup on computers that are running Windows 7 SP1 in nonenterprise environments. After you install the hotfix rollup, the performance of the computers may be improved.

stay updated 🙂

ilantz

How to manually purge Exchange server logs – clean and easy

Update 9/Jun/2015 – Thanks to Josh Davis for the feedback, I’ve added a note about making sure to include both drives (if EDB and LOG files are separated).

Update 21/Oct/2013 – This article suggests that you cannot sustain downtime or interruption for your users while battling with deleting log files or restoring your working backup solution. If you can sustain a downtime (should be around minutes or so) the easiest method will be to enable Circular Logging on your database / storage group – see more here – http://technet.microsoft.com/en-us/library/bb331958%28v=exchg.141%29.aspx#UTL

Update 01/May/2013 – The exchange team has written a script which helps troubleshoot and identity issues with Backups etc.. The script use the DiskShadow utility as well ! check it out @ http://blogs.technet.com/b/exchange/archive/2013/04/29/troubleshoot-your-exchange-2010-database-backup-functionality-with-vsstester-script.aspx


Hi Again !

I often get calls and questions regarding backups and Exchange Server, since ever this issue is not always working as required or as you would expect, but that’s off-topic 🙂

One of the most common stories is that without a working Exchange Server backup when  you perform massive mailbox moves, transaction logs will get piled and fill up the volume or disk that they reside in. and then panic starts, “hey my databases were dismounted…” then of course the administrator realizes that the space on the log drive or volume has indeed ran out and now he needs to figure out what to delete.. and here’s where this post comes in…

So how can you delete or purge Exchange server logs without any risk ? well, in simple – you cannot, because the whole idea of restoring an Exchange or for this matter any transactional database requires you to have a first – “full” backup of the database itself and all transaction logs that were generated since the the date of the database creation date, or the last “successful” “full backup”.

Now here’s a nice method to “fake” a “full backup” or an on-demand transaction logs purge when you see you will be soon out of space, using the Exchange VSS writers and the diskshadow utility (available with Server 2008 or 2008 R2) . This procedure also “proves” that a VSS backup for your Exchange Server will work fine.

note: This method was tested on an Exchange server with Locally Attached Disks, not storage attached LUNs.

Use this method on on your risk. You should preform a “Full Backup” right after this process is done.

This example will show you how to purge the logs for a database that is located on Drive D, the log files of the databases are also located in Drive D. we will “fake backup” drive D and this will trigger the logs to be purged.

Note: If you have separated your log files and database file in different drives, or you want to include additional databases in the “backup” you must include the additional drives in the process, so in the example below, you will “Add volume e:” after “Add volume drive d:” and so on…

  1. Open Command prompt
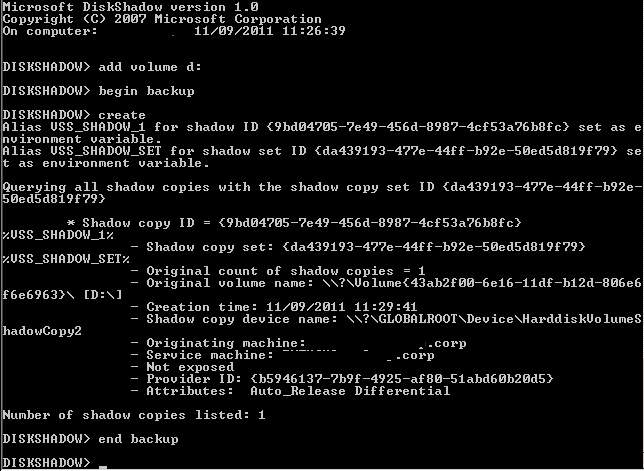
  2. Launch Diskshadow
    1. Add volume d:
    2. (optional, add one line for each additional drive to include) Add volume X:
    3. Begin Backup
    4. Create
    5. End Backup
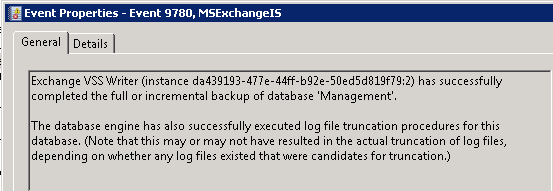
  3. At this step you should notice the following events in the application log indicating that the backup was indeed successful and logs will now be deleted.

Here’s some screenshots from the process:

Diskshadow commands for the example

The Diskshadow example screenshot.

ESE Event ID 2005

ESE – Event ID 2005 – Starting a Full Shadow Copy Backup

MSExchangeIS Event ID 9811

MSexchangeIS – Exchange VSS Writer preparation.

ESE Event ID 224 - Logs being Purged

ESE Event ID 224 – Logs are now purged 🙂

MSExchangeIS Event ID 9780 - Backup complete

MSExchangeIS Event ID 9780 – Backup is now complete.

side note: although this example was tested against Exchange 2010, it should work just as fine with Exchange 2013 & 2007.

Hope this helps you !

ilantz

Microsoft iSCSI Software Target 3.3 is now available freely!

This week Microsoft has made the iSCSI Software Target available for free download !

These are obviously great news for all cluster / shared-storage-in-need people like me 🙂 read all about it at Jose Barreto’s Blog post:

Microsoft iSCSI Software Target 3.3 for Windows Server 2008 R2 available for public download

More quick links:

Enjoy !!

Adding Read-only permissions to Exchange 2007 Auditing Logs

Hi,

I was asked today to add a permission to the Exchange Auditing log which is included with Exchange 2007 SP2 installations to simplify auditing,
after activating Mailbox Access Auditing , I was requested to allow read only permissions to the IT Security group.

What seemed to be quite straight forward, was soon to be changed with SDDL ACL format….

Here’s the quick how-to:

– Note, this was done on a Windows 2008 server

  1. Identify the SID of the user/group you wish to allow access.
    Using powershell you can easily find it e.g:
    Get-User | Select SID
    Get-Group | Select SID
  2. Then following this KB – Which was the most simple and self-explained, add the appropriate permissions.
    http://support.microsoft.com/kb/2028427In-Short – each event log is located in the registry at: HKEY_LOCAL_MACHINESYSTEMCurrentControlSetServicesEventLog
    the Exchange Auditing log is also located there, and in that key you will find an existing CustomSD string value with the ACL’s in the SDDL format ( more info in the links I added below )
    I was required to add read-only permissions to the IT Audit group, which is a “regular” group, without special domain / enterprise rights,
    so in my case i used the following:
    (A;;0x1;;; [Your Group Name/user account SID])
    so appended that to the existing CustomSD value.
  3. Restart the server.
  4. Now the user/group can access the Exchange Auditing log from any computer 🙂

Links:

http://technet.microsoft.com/en-us/library/ee331009%28EXCHG.80%29.aspx – White Paper: Configuration and Mailbox Access Auditing for Exchange 2007 Organizations
http://support.microsoft.com/kb/2028427 – Writing to the Windows Event Log from an ASP.NET or ASP application fails.
http://support.microsoft.com/kb/323076 – How to set event log security locally or by using Group Policy in Windows Server 2003 – Also useful if you’d like to set this via GPO
http://blogs.technet.com/b/askds/archive/2008/05/07/the-security-descriptor-definition-language-of-love-part-1.aspx
http://blogs.technet.com/b/askds/archive/2008/05/07/the-security-descriptor-definition-language-of-love-part-2.aspx
http://blogs.technet.com/b/askds/archive/2008/08/12/event-logging-policy-settings-in-windows-server-2008-and-vista.aspx

Happy Auditing !

Hub Transport Role Install Failed with error 2147504141

Wanted to share with an experience I’ve had with installing Exchange 2010 SP1 on Windows Server 2008 R2 in Hyper-V 2008 R2 environment.

When I i tried to install a fresh server for testing Exchange 2010 SP1 Beta, the setup failed when installing the Hub Transport Role:

Error:
The execution of: “$error.Clear(); install-ExsetdataAtom -AtomName SMTP -DomainController $RoleDomainController”, generated the following error: “An error occurred with error code ‘2147504141’ and message ‘The property cannot be found in the cache.’.”.

An error occurred with error code ‘2147504141’ and message ‘The property cannot be found in the cache.’.

This issue is not “new”, as IPV6 is tend to be disabled as default by many customers, and installations of Exchange 2007 and Exchange 2010 fails with the exact same error if IPV6 is Disabled.

My virtual machine was clean and did not had IPV6 disabled, so I’ve searched this up to the following thread in the Technet Social Forums : Hub Transport Role Install Fail error # 2147504141

A comment from Scott Landry gave a new solution for this, and seems it’s now also been related to Hyper-V, as the suggested KB http://support.microsoft.com/kb/980050 – Error message when the Exchange Server 2010 setup on a Hyper-V virtual machine fails:“2147504141”

Anyhow, disabling the ” Time synchronization ” from the Integration Services settings on the Virtual Machine solved this !

Just a heads up for all of you that might encounter this.

MSExchangeRepl 2147 / MSExchangeRepl 2104 / MSExchangeRepl 2127 occurring on Windows 2008 or Windows 2008 R2 with Exchange 2007 Cluster Continuous Replication (CCR)

As i ran into this issue this week,I’ve stumbled upon this thread: http://social.technet.microsoft.com/Forums/en-US/exchangesoftwareupdate/thread/eca3bbf7-ee9f-41bd-89e8-47a81780292b

Seems the cause for these errors, are because SMBv2 introduces status caching into the LanManWorkstation service…read more at SMB2 Client Redirector Cache

So to fix it I’ve added these registry keys under :

HKLMSystemCurrentControlSetServicesLanmanworkstationParameters
FileInfoCacheLifetime [DWORD] = 0
FileNotFoundCacheLifetime [DWORD] = 0
DirectoryCacheLifetime [DWORD] = 0

My errors on the server were:

Event ID : 2147
Raw Event ID : 2147
Source : MSExchangeRepl
Type : Error
Machine : SERVER
Message : There was a problem with ‘ActiveNode’, which is an alternate name for ‘ActiveNode’. The list of aliases is now ‘ActiveNode’, and the alias ‘was’ removed from the list. The specific problem is ‘CreateFile(
\ActiveNodeStorageGroupGuid$LogFile.log) = 2′.

ID:       2127
Level:    Information
Provider: MSExchangeRepl
Machine:  SERVER
Message:  The system has detected a change in the available replication networks.  The system is now using network ‘ActiveNode’ instead of network ‘ActiveNode’ for log copying from node ActiveNode.

Thanks a lot for JR on sharing this, check out Tim McMichael with more info on this:

http://blogs.technet.com/b/timmcmic/archive/2010/07/11/msexchangerepl-2147-msexchangerepl-2104-msexchangerepl-2127-occurring-on-windows-2008-or-windows-2008-r2-with-exchange-2007-cluster-continuous-replication-ccr.aspx

Exchange 2007 SP3 is out !

At last !

Exchange Server 2007 Service Pack 3 was released this week !

What’s New ?

  1. Top requested Support for Windows Server 2008 R2 server installations
  2. Windows 7 – for Exchange 2007 Management Tools
  3. Improved Password Reset Functionality – Enable the Exchange 2007 SP3 Password Reset Tool
  4. Updated Search Functionality – mailbox server side indexing
  5. Support for Right-to-Left Disclaimer Text
  6. And of course… Active Directory Schema Changes, although with only a few changes but still take that into account.

Don’t forget the installation path to success :

  • Prepare your environment – Forest changes..
  • Upgrade Client Access servers (Internet Facing first…)
  • Upgrade Unified Messaging servers
  • Upgrade Hub Transport servers
  • Upgrade Edge Transport servers
  • Upgrade Mailbox servers

Enjoy !

Reference:
Ask and you shall receive – Exchange 2007 SP3 w/support for Windows Server 2008 R2 Now Available
What’s New in Exchange Server 2007 SP3

Exchange 2007 SP3 Release Notes

Download Exchange 2007 SP3 here

Delete old removed or disconnected device drivers

So you’ve plugged a harddrive / disk-on-key or any other hot plugged device, and oops BSOD 🙁

or, you want to install a new driver for a device that you have removed, but windows magic plug-and-play installed the driver automatically…. but you don’t want that do you ?

Anyway there’s an old method that works great.

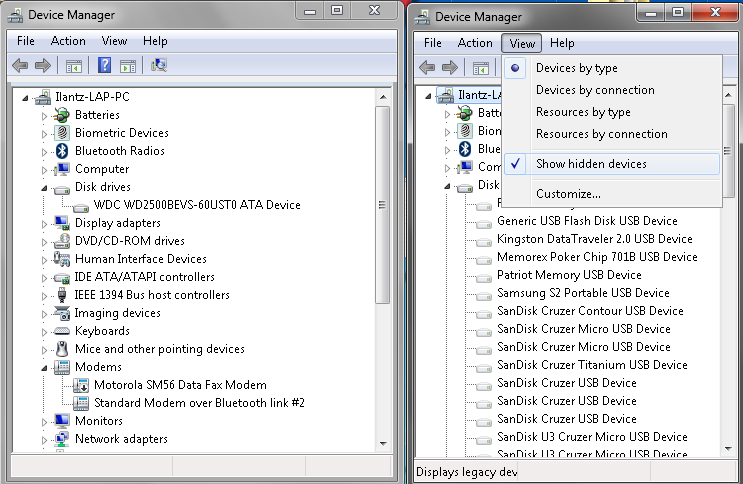
You open device management, and click , view “show hidden devices”… but you fail to see your disconnected devices…

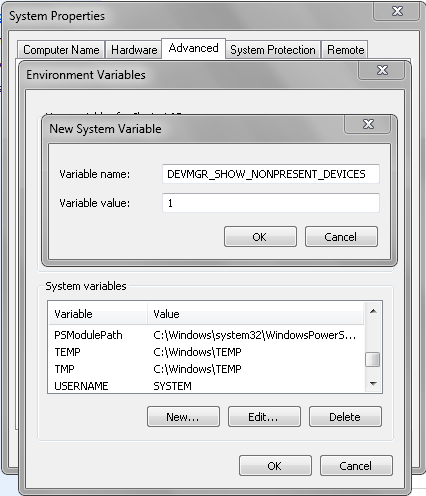
FIX – Show all disconnected devices, open System Properties, click Environment Variables and click to add a New System Variable.

Configure a New System Variable

After this you will be able to launch Device Manager again and when you’ll click to Show Hidden Devices, you will see all those removed or disconnected device drivers !

Device Manger Before-After

That’s it ! Enjoy