Controlling External Collaboration in Microsoft Teams

Most organizations are required these days to enable collaboration solutions and services with external parties. these may include b2b scenarios or b2c in some cases.

In this blog I’ll be specific to Office 365 Group resources, with Microsoft Teams as an example, you should be aware that each Team in Microsoft Teams corresponds to an Office 365 group.

A common ask is “We wish to enable only named people to join as a guest to our Teams, we don’t want anyone from the organization to invite anyone they like – we need to control this with an internal workflow.”  to satisfy this request, we will use native capabilities within Azure Active Directory and Office 365 to enable group owners to add existing external guests to their team/office 365 group. In addition, we will enable only specific people in the organization with the permission to create and add new guests accounts to the directory.

Note: This is the basic example, this can be adapted to more complex workflows of approval/automation to make this more customized to a specific requirement.

      1. In Office 365 Admin Center, navigate to “Services & add-ins”, select “Office 365 Groups” and enable “Let group owners add people outside the organization to groups”

         enable-office-365-group-guest
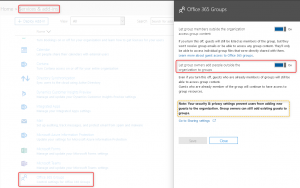
        Enabling the capability to add external guest accounts to Office 365 groups.
      2. To make sure your guests will also have access to the SharePoint files, enable external sharing using the SharePoint Admin Center. with alignment to our blog theme, we will enable access to Existing accounts only.

        enable-external-sharing-in-sharepoint
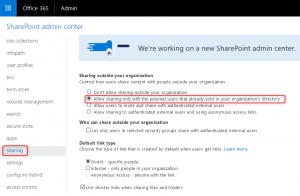
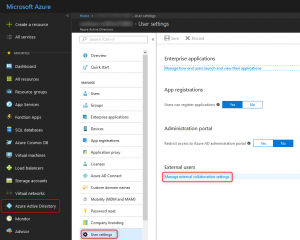
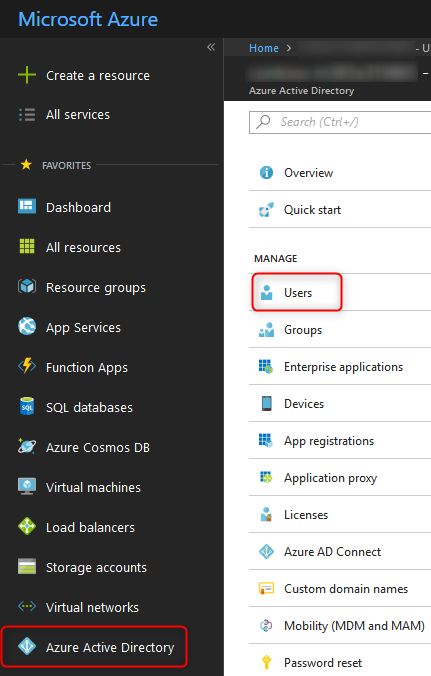
        Enabling external content sharing within SharePoint to allow guests to access the files within Microsoft Teams.
      3. We are now ready to limit who can invite external guests. we will configure this using the Azure Active Directory blade in the Azure portal.
        Azure-AD-manage-external-collaboration

        Azure-AD-only-admins-can-invite
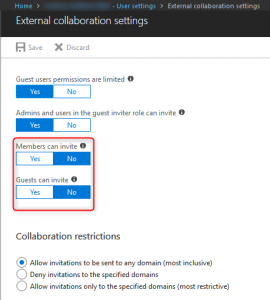
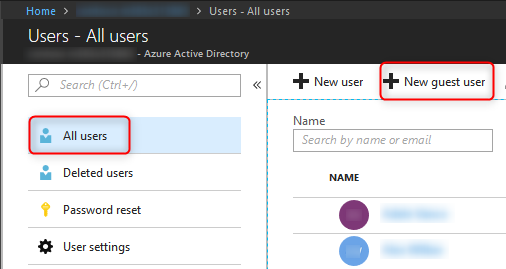
        Disabling the capability for non-admin or users with the guest inviter role to add new external guest accounts to the directory

        Disabling “Members can invite” and “Guests can invite” will effectively achieve our goal – “Admins and users in the guest inviter role can invite”

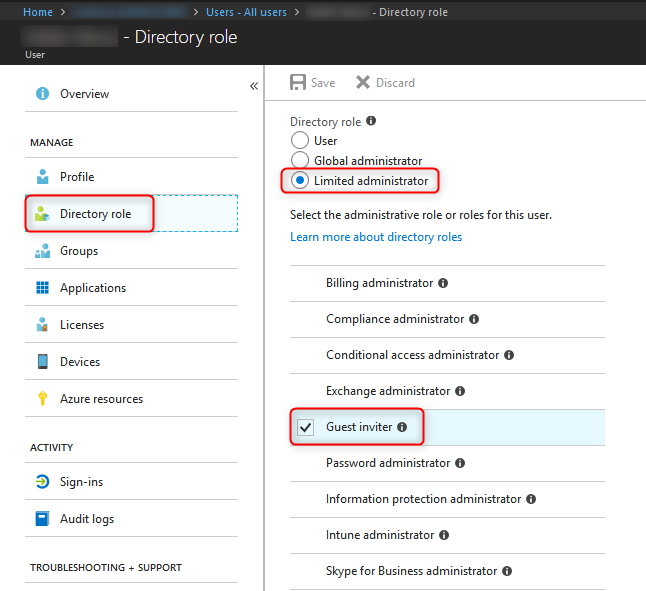
      4. Finally add assign the “Guest inviter” role to whom ever you need

        Azure-AD-assigning-guest-inviter-role
        Assigning the “Guest inviter” role to a specific user account.

The configuration is now complete, a Guest Inviter or an Admin can now add new guests to the directory, and follow whatever internal due diligence or workflow prior to that. Using the (new) AzureAD PowerShell module is my personal recommendation, this way the guest user could be silently added to the directory – and an email will not be sent to him. later on an owner of an Office 365 Group or a Microsoft Teams group could add him easily like any other member – and that will trigger the email invite to the external user.

New-AzureADMSInvitation -InvitedUserDisplayName "John Doe (External)" -InvitedUserEmailAddress "john.doe@contoso.com" -SendInvitationMessage:$false -InviteRedirectUrl "http://just.a.placeholder.local"

Using the Azure AD portal is also available to the guest inviter role if PowerShell is out of the question

Adding a new external guest account to the directory.

And if you’ve wondered, this is the error if someone would try to add a new guest account and they don’t have the proper permissions in Microsoft Teams.

Enjoy!

Azure AD Federated SSO and MFA on-premises with ADFS

Updates:

2017-07-27 – I’ve included another important note about adding the “Authentication Methods References” claim


Hi again, this is a quick note for anyone who will try to achieve this. I’m writing this post after the topic has been raised from customers and my colleges.

Here are some of the challenges that might brought to you here

  • An Azure AD tenant, with a federated domain pointing to an ADFS
  • ADFS server running 2012 R2 / 2016 with a Multi Factor setup, either with Azure MFA or a 3rd party MFA provider
  • A conditional access / identity protection policy in Azure AD which should enforce Multi Factor authentication
  • ADFS 2016 with Azure MFA set as primary authentication
  • Event ID 364 on the ADFS server – Encountered error during federation passive request. MSIS7042: The same client browser session has made ‘6’ requests in the last ‘4’ seconds

While configuring this, you might get multiple Multi Factor prompts, user performs MFA on-premises, but when redirected back to Azure AD – second factor prompt in cloud is presented. Here’s how you win:

  • Make sure you configure the federated domain setting in Azure AD with -SupportsMFA $true – this will point Multi Factor“requests” to the ADFS:

Set-MsolDomainFederationSettings -DomainName <name.com> -SupportsMFA $true

See more here – https://docs.microsoft.com/en-us/azure/active-directory/active-directory-conditional-access-azuread-connected-apps#conditional-access-rules-with-mfa

  • In addition to the above you also need to make sure to configure -PromptLoginBehavior Disabled, this will make sure that authentication requests from Azure AD will reach the ADFS “correctly” and won’t cause it to re-authenticate your users:

Set-MsolDomainFederationSettings -DomainName <name.com> -PromptLoginBehavior Disabled

See more here –  https://docs.microsoft.com/en-us/windows-server/identity/ad-fs/operations/ad-fs-prompt-login

Note that for ADFS 2012 R2, the July 2016 update rollup is required for this parameter to work.


With only setting Azure MFA set as Primary, you effectively do NOT perform Multi Factor. please read carefully Configure AD FS 2016 and Azure MFA and see the notes around it.

If you have policy which will enforce Multi Factor and your setup is Azure MFA as Primary – follow the steps above first.

If you’d like to “skip” the second prompt in the cloud, you can either re-think your CA policy 🙂 or follow https://docs.microsoft.com/en-us/windows-server/identity/ad-fs/operations/create-a-rule-to-send-claims-using-a-custom-rule to add the following claim using a custom rule:

c:[Type == "http://schemas.microsoft.com/claims/authnmethodsreferences"]
=> issue(Type = "http://schemas.microsoft.com/claims/authnmethodsreferences", Value = "http://schemas.microsoft.com/claims/multipleauthn");

This rule will effectively add all your users a static “fake” claim which states they have performed Multi Factor successfully.

ilantz

EMS license assignment to all users made easy

So you’ve purchased Microsoft’s Enterprise Mobility Suite (EMS) licenses, now you need to assign them to users within your organization. A typical situation will be that you already have Office 365 licensed users, and it make sense that all of them will get EMS licenses too.

To achieve this, I would suggest using an Azure AD group with Dynamic Group membership. in this example, the group will include accounts that match ALL these conditions:

  • Enabled users accounts
  • Users with an email address
  • Users with a-non empty Usage Location
  • Synchronized user accounts

Within the Azure AD management portal (http://manage.windowsazure.com) navigate to your Active Directory tenant, and perform the following:

  1. Create a group in Azure AD
  2. Enable it for Dynamic Membership
  3. Enter the advanced rule: (user.accountEnabled -eq “true”) AND (user.mail -ne $null) AND (user.usageLocation -ne $null) AND (user.dirSyncEnabled -eq true)
  4. Assign EMS licenses to the Group

You can read more about Dynamic Group Membership here:

http://blogs.technet.com/b/ad/archive/2015/03/09/attribute-based-dynamic-group-membership-for-azure-ad-premium-is-now-in-preview.aspx

https://azure.microsoft.com/en-us/documentation/articles/active-directory-accessmanagement-groups-with-advanced-rules/

You can also assign licenses with the following methods:

  1. Using the Office 365 Portal – like you would add Office 365 licenses.  This was made available late 2015 – http://blogs.technet.com/b/microsoftintune/archive/2015/09/01/intune-and-ems-subscriptions-now-available-in-the-office-365-portal.aspx
  2. Using Azure AD PowerShell – http://blogs.technet.com/b/treycarlee/archive/2013/11/01/list-of-powershell-licensing-sku-s-for-office-365.aspx ,you can use the following example to assign EMS licenses (with all options) only to users with an Office 365 E3 license:
    $EMSSKU = (Get-MsolAccountSku | ? { $_.AccountSkuID -like "*:EMS"})[0].accountSkuId
    Get-MsolUser -All | ? { $_.licenses.accountsku.SkuPartNumber -eq "ENTERPRISEPACK"} | Set-MsolUserLicense -AddLicenses $EMSSKU
  3. Azure AD Graph API – https://msdn.microsoft.com/en-us/library/azure/ad/graph/api/users-operations#FunctionsandactionsonusersAssignalicensetoauser

Enjoy

ilantz

High Resolution User Photo Synchronization to Office 365

There are some known limitation and inconsistency with user photos synchronization from Active Directory (using the thumbnailPhoto attribute) to Azure AD and Office 365 apps: Exchange, SharePoint and Skype for Business (aka Lync), specifically if you want to upload high resolution photos of your users that will span across all of Office 365 services.

After spending some research time around this issue, here are my findings:

So to summarize at this point, we want to import high resolution photos to our users. If we rely on the thumbnailPhoto attribute value from Active Directory, we will end up with low resolution images (needs more JPEG effect) or inconsistent results if we look on the SharePoint case.

To upload high resolution photos to Office 365, you should use Set-UserPhoto. This approach works great for Exchange Online, Skype for Business and Azure AD. Although promising, my testing (and others..) showed that if your users’ photos were previously synced to SharePoint Online – they will not necessarily be updated using this method.

Here is my take on solving this, in a somewhat chronological order:

  1. If you need your on-premises thumbnailPhoto attribute populated, keep your current practice of maintaining them.
    1. To avoid future inconsistencies – use “Azure AD app and attribute filtering” to filter out thumbnailPhoto using Azure AD Connect – Custom installation of Azure AD Connect
  2. Utilize the Set-UserPhoto cmdlet in Exchange Online PowerShell to upload your users high resolutions (648×648 px) photos
    1. Note Uploading High Resolution Photos using PowerShell for Office 365 to workaround – “The remote server returned an error: (413) Request Entity Too Large” error if you get this.
  3. To upload your users high resolution photos to SharePoint online use the Core.ProfilePictureUploader sample app from the OfficeDev PnP GitHub repo.
    1. To make this easier to non coders 🙂 I’ve complied the code sample for your usage – http://ilantz.com/files/Core.ProfilePictureUploader.zip
      1. Get the source code here and also make sure to read the FAQhttps://github.com/OfficeDev/PnP/tree/master/Samples/Core.ProfilePictureUploader
      2. Follow the explanations in the GitHub page link above around how to run the utility (configuration.xml , the CSV input file and the command syntax).
      3. Make sure your pictures are JPEG files…
    2. This sample app is also documented here, with some additional explanations – Upload user profile pictures sample app for SharePoint

That’s it !

Hope this helps anyone, please comment if it did.

ilantz